New Koch Snowflakes

I was working with Thomas a few weeks ago in his quest to learn how to create fractal images.  He essentially asked the following question:  How can you locally change the appearance of a fractal?

For example, consider the well known Koch snowflake (which we discussed earlier on Day007), shown below.

Day033Koch1b
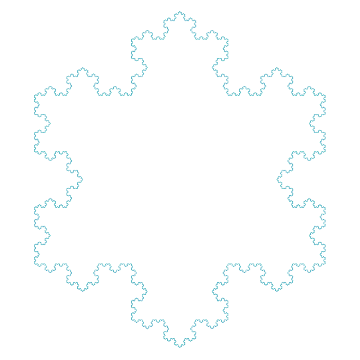
Thomas asked if it might be possible to keep the overall shape of the snowflake, but change the details at the edges.  To discuss this possibility, let’s recall the algorithm for producing the snowflake (although this algorithm produces only one-third of the snowflake, so that three copies must be put together for the final image):

sf1(n):

  • if n = 0, then draw a line segment,  otherwise:
  • sf1(n-1); turn -60; sf1(n-1); turn 120; sf1(n-1); turn -60; sf1(n-1)

This is “pseudocode” for drawing part of the snowflake n levels deep.  The difficulty is that the segments are drawn only when n = 0.  Thomas was wanting something different to happen, say, at level 3 and below in an algorithm which recursed 6 levels deep.

Then it occurred to me — there’s no reason the “otherwise” couldn’t be broken down into further cases:  make the recursive call depend on the value n.

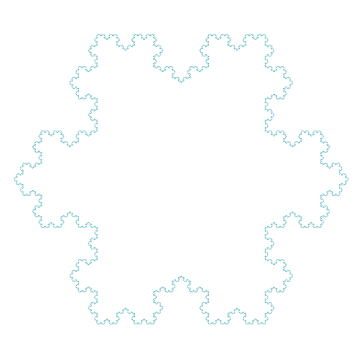
But in order to do this, I needed to use a different recursive call.  What to use?  Well, it happens that by slightly changing the angles in sf1, the snowflake undergoes a rotation by 30 degrees.  Here is the pseudocode, along with the image.

sf2(n):

  • if n = 0, then draw a line segment,  otherwise:
  • sf2(n-1); turn 120; sf2(n-1); turn -60; sf2(n-1); turn 120; sf2(n-1)

Day033Koch2

So how do we combine these fractals?  As suggested earlier, break down the original “otherwise” clause.  The following algorithm adds a “little” of the second snowflake to the first since the second algorithm is only called when n = 1.

new1(n):

  • if n = 0, then draw a line segment, otherwise:
  • if n = 1, sf2(n-1); turn 120; sf2(n-1); turn -60; sf2(n-1); turn 120; sf2(n-1)
  • else sf1(n-1); turn -60; sf1(n-1); turn 120; sf1(n-1); turn -60; sf1(n-1)

Here is the resulting fractal image (recursing 6 levels):

Day033Koch3

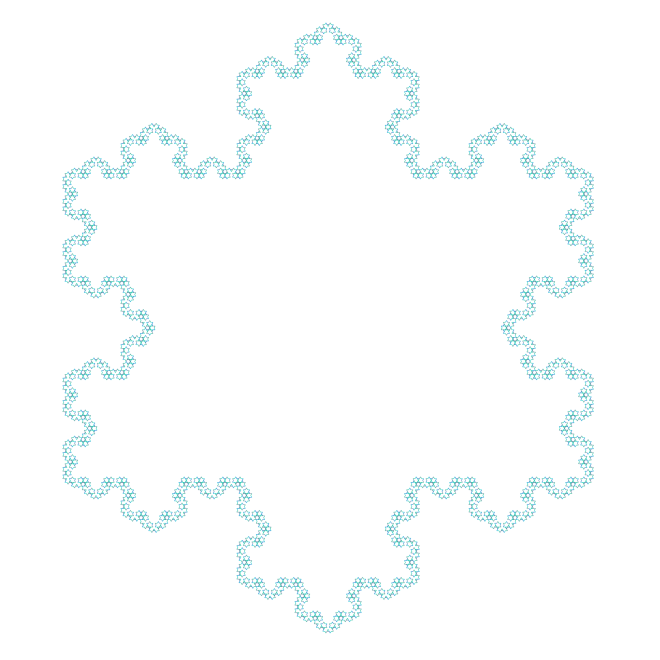
You can already see a difference.  Now let’s try adding a little “more” of the second snowflake by using the second algorithm when n is 1 or 2, as shown below.

new2(n):

  • if n = 0, then draw a line segment, otherwise:
  • if n <= 2, sf2(n-1); turn 120; sf2(n-1); turn -60; sf2(n-1); turn 120; sf2(n-1)
  • else sf1(n-1); turn -60; sf1(n-1); turn 120; sf1(n-1); turn -60; sf1(n-1)

Day033Koch4

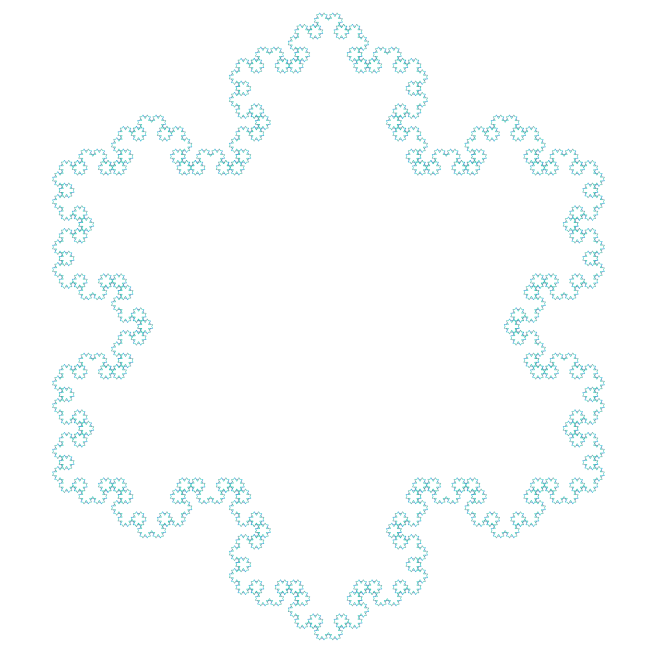
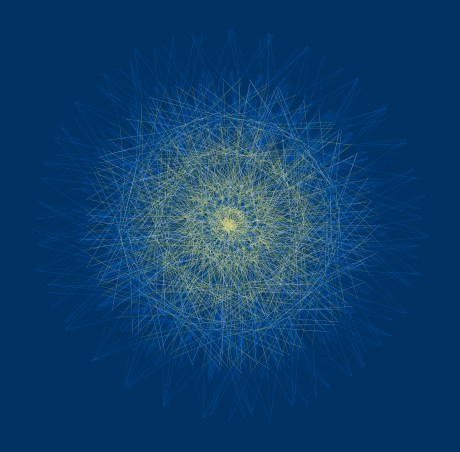
Going one level further — using the second algorithm when n is 1, 2, or 3 — produces the following curve.Day033Koch5

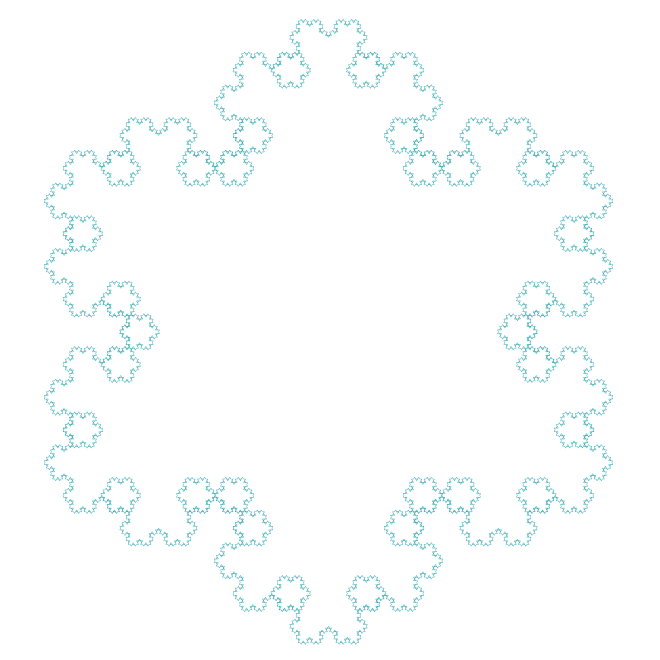
One level further yields:

Day033Koch6

And we’re done, since the next level will in fact give the rotated snowflake sf2(6) (although pieced together a little differently — but the resulting fractal is the same).

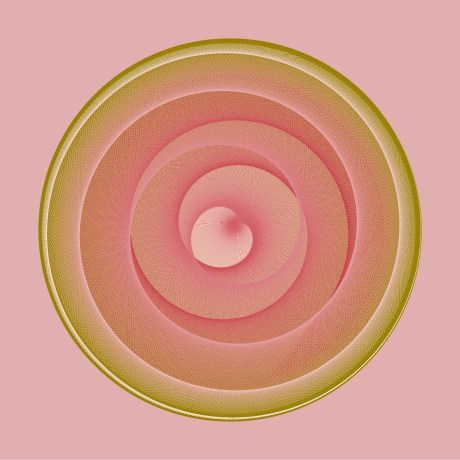
Now I’ll leave it up to you.  There’s really so much to explore here.  Here’s just one example.  Adding just one additional call to sf2(n-1) after the last one in the algorithm produces the following image:Day033Koch7
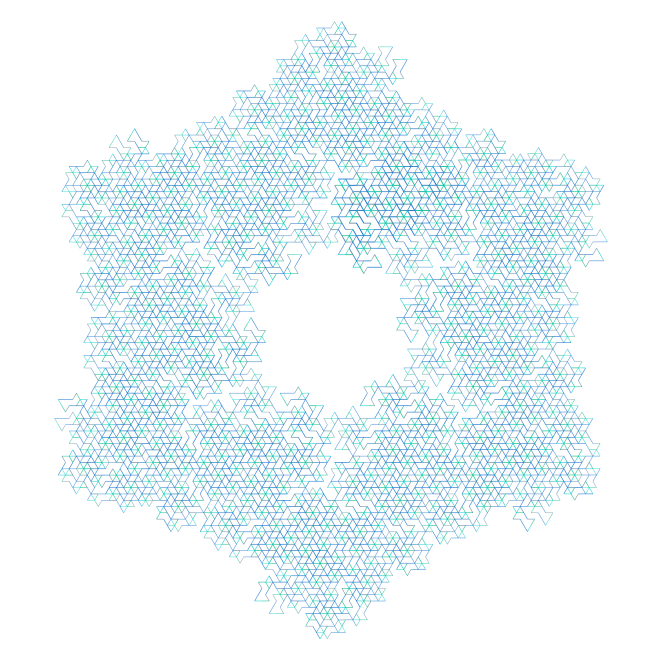
Amazing, isn’t it?  Such a small change results in a very different feel to the final image.  And of course once smaller changes are made, there’s no reason to stop.  Maybe branch into more than two fractal routines?  Or maybe perform sf1 when n is odd, and sf2 when n is even.  Or….

The only limitation, it seems, is one’s imagination.  Comment if you create something interesing!

Number Searches II

This week I’ll talk about the solution to the final puzzle from last week — so if you haven’t tried it yet and want to, now’s the time!

For reference, here’s the puzzle:

Day031Fig4

The hints were that all circled numbers in the grid were four digits long, and that every number in the grid was used at least once.  The object was to determine two bases:  the base used to write the numbers in the list, and the base used for the circled numbers in the grid.  Then the rest is easy!

To start, I chose the bases first.  My first attempt was to use 41 and 19, although this didn’t quite work out (for reasons we’ll soon see).  I didn’t want the numbers in the list to be too long, so I chose bases which weren’t too far apart.  The bases happened to be prime numbers — but later on I saw that this information really doesn’t help the solver at all.  No harm done, though.

Now the main issue was that I wanted the numbers both in the list and the grid to use only the digits 0–9.  So next I used a brute-force loop to check all numbers up to 10,000,000 which only used the digits 0–9 in base 41.  Of these, I checked which used only the digits 0–9 in base 19.  There were only 2640 numbers — not very many, actually, out of 10,000,000.  (I used Mathematica here, since using Python in the Sage platform would have been far too slow.  Also, it is very easy in Mathematica to convert numbers from one base to another using the functions “IntegerDigits” and “FromDigits.”)

But what was I going to do with these numbers?  I decided I wanted a solution strategy which didn’t use the ending 0 again — I had used this device twice already.  I thought that if I looked for numbers which were off by just 100 in base 41 in the grid — and made sure the solver had enough clues to determine the corresponding numbers in the list — well, I’d be making progress.

Let’s look at the puzzle for a moment, so you see what’s at play here.  Notice that the largest number is roughly three or four times the smallest (3 x 1 = 3 in any base larger than 3!).  But there are two small numbers close to each other — 14940 and 14965 — they can’t begin with 0, naturally, and there is only one number you can circle in the grid beginning with a 1.  So they must at least start with a 2.  But they can’t start with a 3 or greater, or else the largest numbers would have to start with at least a 9 — and 7 is the largest number in the grid.  Therefore the two smaller numbers must start with a 2, and the three largest must begin with a 7.

And you’ll notice that there are the two numbers 7034 and 7134 in the grid — off by 100.  But here was my problem — when I looked at my list of numbers which used only the digits 0–9 in both bases 19 and 41, I couldn’t find any which were 100 apart in base 41.

Then I realized why.  In base 41, 100 represents 412 = 1681.  And the base 19 digits of 1681 are 4, 12, and 9.  See the problem?  There’s no way to be off by 12 in the base 19 list using only the digits 0–9!

So I needed to find a base whose square could be written in base 19 using single digits.  It turns out that 41 wasn’t too far off….432 = 52619.  And if you notice, 45311 and 45837 are off by exactly 526.  Recall that since these are the largest numbers, they must be the ones beginning with a 7.  (Note that the other four-digit number in the grid, 7042, is between 7034 and 7134, and so must correspond to 45334.)

What does this mean algebraically?  Let’s denote by L the base used in the number list, and  let G be the base used in the grid.  To say that being off by 100G in the grid is the same as being off by 526L in the list is to say that

G2 = 5 L2 + 2 L + 6.

So this is one relationship between G and L.

Now there are two ways to proceed.  You might try to figure out another relationship between G and L using 7042 and 45334.  Note that 7042 is in fact G – 2 more than 7034 (observe that a carry is involved), and 45334 is 23 more that 45311.  This would mean that

G – 2 = 2 L + 3.

Alternatively, note that the smallest two numbers must be represented by 2154 and 2164 in the grid (2407 is too big, since the numbers are only 25 apart in base L).  But 2154 and 2164 are just 10 apart in base G, so

G = 2 L + 5,

which you’ll note is equivalent to the previous equation.

But we now have two equations in two unknowns — just substitute for G into the quadratic, rearrange terms and simplify, and you’ll end up with the quadratic equation

L2 – 18 L – 19 = 0.

It’s not hard to see (just factor!) that the only positive root of this equation is L = 19.  This means that

G = 2 x 19 + 5 = 43.

So we’re just about done!  I’ll leave it to you to do all the conversions from one base to the other.  But once we know the bases, the rest is easy.

Of course there was no way I could have created this puzzle without a computer — finding numbers which can be written with the digits 0–9 in two different bases is just too difficult to do by hand (at least for me).  But even when this was done, it  was not a trivial task.  I pored over the numbers, looking for ones with the “right” digits.  Since I wanted the largest numbers to begin with 7, I avoided 8’s and 9’s in the corners.  I thought the solver needed some entry point without having to go down too many dead ends.

And then, well, the numbers had to fit.  Since the corners are common to so many entries, I had to look for numbers which started and ended with suitable digits.  This took some creative juggling!

Finally, I wanted to make sure that there were numbers differing by 100 and 10 in the grid. Again, the solver needed an entry point into the puzzle.  Just writing a computer program to look at every single possibility could be done — but then why spend all the effort making a puzzle which can, in large part, be solved by hand?  Just randomly picking numbers and writing them in bases 19 and 43 would certainly have been possible, but far from interesting.

If you feel adventurous enough to create your own Number Search puzzle, please comment.  I’d love to see what others might do with this idea!

Number Searches I

It’s been some time since there have been any puzzles to solve.  I’ve created something new (well, as far as I know) just for my blog.  I hope you enjoy it!

Many puzzle magazines have puzzles where you need to find words or numbers hidden in a grid. They may be placed in a straight line horizontally, vertically, or diagonally, and may be written either backwards or forwards. Here’s one for you — find the numbers at the right in the grid on the left.

Day031Fig1

Looks like there’s not enough room? Well, there’s a twist in this puzzle. The numbers are written in base 10 on the right, but in the grid, they’re represented in a different base, which you need to determine. Now this is a bit trickier, so I’ll give you two hints. First, the base is a prime number. And second, all the numbers in the grid are used in the completed puzzle. We’ll work out the solution next — so if you want to try to solve it on your own, now’s the time.

Impossible?  Seems like it — until you notice where the 0’s are in the grid.  Since numbers don’t begin with a 0, and since you’re given that every number in the grid must be used — that means that some numbers end in a 0, meaning they’re a multiple of the base.  And since you’re given that the base is prime, that suggests looking at the prime factorizations of the numbers on the right.

You can look at some python code to find prime factorizations of numbers — both recursive and iterative versions.

112 24 . 7
373 prime
3181 prime
8533 7 . 23 . 53
11,665 5 . 2333
14,420 22 . 5 . 7 . 103
1,354,097 29 . 53 . 881

This table shows the prime factorizations of the numbers to be found in the grid.

So what do you notice?  Since at least two of the numbers end in 0 in the grid, at least two of the numbers must share a common prime factor.  The only prime factors that any numbers have in common are 2, 5, 7, and 53.

But note that there are the digits 8 and 9 in the grid — which means that the base must be at least 10.  This eliminates all possibilities except 53.

Alternatively, you can notice that any number on the right can be expressed using at most four digits in the “mystery” base.  Since 344 is only 1,336,336, the base must be at least 35.  This would also eliminate all options except 53.

Once you know the base, the rest is fairly straightforward — once you know how to write numbers in base 53!  Luckily, I’ve also written some python code to perform this task for you, as well.  It’s the usual algorithm — find the highest power of 53 less than the number (using logarithms), find the corresponding digit, subtract, and repeat.  You’re welcome to take out your pocket calculator, write your own code, or just use mine.  But there’s no avoiding this task.

Whatever the method, you should have come up with the following results in base 53, listed in increasing order: 26, 72, 171, 320, 485, 574, and 9530.  Below you’ll see the completed puzzle.

Day031Fig2

Where did this idea come from?  It’s never possible to say exactly where an idea “comes from.”  I was thinking about taking an ordinary puzzle and adding a new twist.  The idea of using different bases popped into mind.

Then the challenge was to create a puzzle that had some interesting feature — like the 0’s.  I knew that one way to solve the puzzle would be to write a computer program which would take all the numbers in the list, and write them in different bases starting (in this case) at 35.  Then see which lists could be found in the grid.  Not so very interesting.

But with the hint and two zeroes in the grid, well, I felt I was making some progress — and I hope you’ll agree….

Now I needed to come up with another puzzle or two — which were related to the example, but which didn’t simply require going through the same steps.  Maybe only one zero instead of two?  How was that much different?  I pondered for a few minutes, and came up with the following.

In the following Number Search puzzle, find the numbers on the right in the grid on the left (written in some prime base).  Fill in all the missing numbers (which are all single digits) in the grid, and find the missing number in the list on the right (which is in increasing order).  You know that every number in the grid is used in the completed puzzle, and that the missing number on the right does not end in 0 when circled in the grid.  Good luck!

Day031Fig3

Although likely a challenge if you’ve never done a puzzle like this before, I thought it must be possible to introduce still another level of difficulty for the truly dedicated solver.  So here’s another.

In the following Number Search puzzle, find the numbers on the right in the grid on the left.  The catch?  The numbers on the right are not written in base 10 (although they are all written in the same base), and the numbers to circle in the grid are also not in base 10 (although, again, they are all in the same base).  Your task to find both bases and solve the puzzle!

Day031Fig4

The bases are prime (but I don’t think that will actually help at all).  A few other hints:  as in a usual search puzzle, you can’t count “1011” and “1101” as two different numbers — once you circle a set of numbers, you can’t use it again in the reverse order.  Of course no number in the grid begins with “0.”  And finally, all circled numbers in the grid are four digits long, and every number is used at least once.  As a further tease, you can find out the bases with just a few lines of algebra — you only need a computer/calculator to convert from one base to the other!

Next week, I’ll explain how I designed the puzzle (and in doing so, give the solution as well) — there were two big hurdles.  First, the numbers had to use only the digits 0–9 in both bases.  And second, I wanted to be sure there was some way to solve it without an exhaustive computer search.  More next week.  Happy solving!

The Joy of Ink II

Last week, I talked about finding a printer I could work with — in my case, a local print shop recommended by my housemates.  This week, I’d like to talk about some of the details of getting my prints to look just right.  But a word of caution:  your situation will likely be quite different!  But I hope that what I have to share can give you some idea of  the issues you need to think about.

Of course the primary issue is color.  Unless you’re very lucky, the first time you print a digital image will be somewhat disappointing.  Shops will have different printers, and different brands and quality of ink and paper.  It’s almost impossible to predict what an image will look like, even if you’re aware of some of these differences.

I did decide to buy a subscription to Photoshop — many shops use it, and for a few dollars a month, well, I decided that was one variable I could control.  At least we’d be working with the same software….

I made sure my image was in CMYK mode (Image > Mode > CMYK Color in Photoshop), since printing with ink involves subtractive color.  Some trial and error revealed that if I added +80 on the Magenta–Green scale and +40 on the Yellow–Blue scale (Image > Adjustments > Color Balance) and then printed, the colors came pretty close.

I’m learning that pretty close is good enough…it’s almost impossible to match colors exactly.  When I write code I can be as precise as I like — but I have learned to be more flexible when it comes to printing.  There’s no other sane choice….

And sometimes, well, there’s a pleasant surprise.  I was printing out my favorite spiral for an Art Exhibition at a mathematics conference,

Day030Spiral

and it was pretty far off — but to my real surprise, good.  The colors were a bit muted, giving a more naturalistic, organic feel, and the contrast with the greenish background was more intense.  I liked it, and decided to use it.

I was beginning to realize that not only is it impossible to exactly duplicate the colors on your screen in print, but it might very well be the case that you want the colors of the printed image to be different.  A computer screen is backlit, while a print isn’t — and this impacts the way you see an image on your computer screen vs. the way you see a printed copy.  You interact with the image differently, because the media are different.

So there’s definitly a give-and-take with color.  Resolution is the next big issue.  Your computer screen is essentially a rectangular grid of pixels — possibly a very large number of them (my computer screen has about 1.3 million) — but still, any image is just an array of colored dots on a grid.

This issue was significant in printing out the following image for the same Art Exhibition.

Day009koch011-191

The first attempt was just dark, with very little yellow or white visible.  In fact, I almost thought it good enough — I even purchased it and brought it home with me — but as I kept looking at it, well, I knew it wasn’t right.

I looked at the code which produced the star, and found a possible suspect — the line width.  I had set it to 0.002 inches — very thin.  Because one color of ink bleeds a little into the next color, there was too little of the lines left to be clearly visible.

So I decided to try doubling the line width to 0.004 inches.  It was perfect!  I have to admit, it was the easiest fix I’ve ever made — seems it’s never that easy.  But the real point I want to make is that when I doubled the line width, the image on my computer screen did not change.  There were no visual clues to tell me that my lines were too thin — after all, you can never get a line thinner than a pixel.

When I first starting programming computer graphics, I would frequently set the line width to zero, meaning the printer would print the thinnest line possible.  With the resolution of printers at the time, this was just perfectly adequate.Day028rhdodecaNo longer.  I did some experimenting and found that for producing nets for polyhedra (such as the rhombic dodecahedron above), a line width of 0.006 is good.  Easily visible, but not too thick.  And as mentioned earlier, when working in thousandths of an inch, one or two can make a big difference in what the final image looks like.

I have to admit I haven’t really dealt much with the issue of paper — but there are definitely things to think about here.  Thickness, gloss, etc.  For my immediate needs, a fairly thick, semi-glossy paper was fine — I didn’t need to make a museum-quality print.  But soon I’ll be branching out into making greeting cards, and then, I’ll need to confront the paper issue head on.  Working in small batches on expensive paper means it’s a lot harder to make any money….

So these are the main issues I’ve had to deal with so far as a digital artist.  I’m sure they won’t be the last — and if (when!) I learn anything else that’s really significant, I’ll write a Joy of Ink III.

I’m really hesitant to give advice — but having said that, here goes.  Be patient and flexible.  There are a lot of details to consider, and it’s very difficult to get a project done perfectly and quickly.  There is definitly a learning curve — and I think there will always be a learning curve, since technological progress will continue to increase the number of affordable options for the digital artist.  But rather than be frustrated by this, I think it’s saner to be excited by it.  What we take for granted today was almost unthinkable ten years ago — so who can predict what will be possible ten years from now?  Certainly not me.  But that’s half the fun of it….