This and the next post will walk you through how to create digital art similar to Evaporation. I’ll also show you some Python code you can use yourself to experiment.
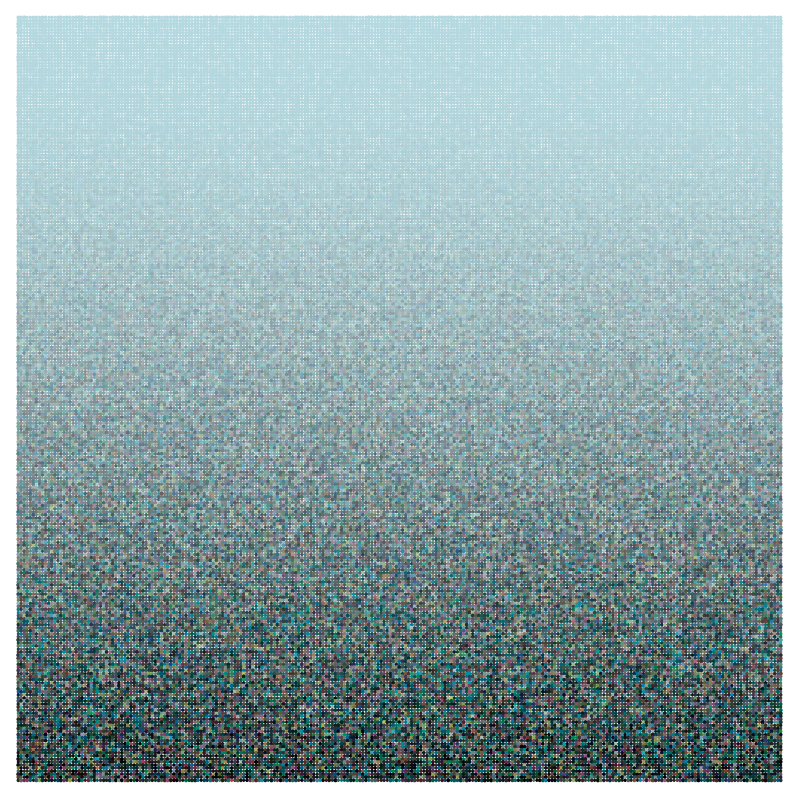
There are three significant features of Evaporation. First is the randomness of the colors. Second — if you look closely — the sizes of the circles are also different; these are randomly generated as well. The third feature is the gradient of the color — from a pure sky blue at the top, to a fairly randomly colored row of circles at the bottom. We’ll look at the first two features today.

Let’s look at color. In the figure above, the small teal square at the left has RGB values of 0, 0.5, and 0.7, respectively. The larger square at the left consists of 100 smaller squares. The color of each of these squares is generated by adding a random number between 0 and 0.1 to each of the RGB values 0, 0.5, and 0.7 — with a different random number added to each value. In the middle square, a random number between 0 and 0.2 is added, so this creates a wider range of color values. For the right square, the random numbers added are between 0 and 0.3.
But there is no reason that the ranges need to the same for each color. In the images below, the red values have a wider range of randomness then the green, which is “more random” than the blue.
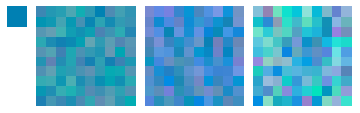
You can see that different ranges of random numbers create different color “textures.” This is where I think computer meets art — as a programmer, when it comes to creating random numbers, you have to specify a range for the randomness of each variable. The choices you make determine how your image looks. How do you make “artistic” choices? There is no easy answer, of course.
Another way to use randomness is by varying the size of the graphic objects. In the left square below, texture is created by randomly changing the radii of the circles.
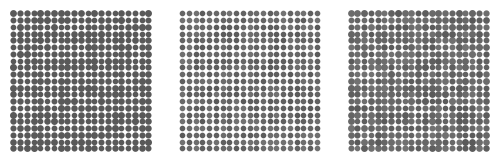
In the middle square, the circles are all the same size, but random shades of gray. The right square varies both the size of the circles and their color. The final result depends on “how much” randomness is used. You can try it for yourself by altering the Python code linked to below — change the randomness and see what happens!
I think of my laptop as an art laboratory. It is a place to experiment with different ideas — change this parameter, increase randomness, try out different color combinations. Can you imagine creating any of the images in this post by hand? The computer allows us to perform experiments unthinkable to Rembrandt and Van Gogh. We may lose the texture of brush strokes or the dimensionality of paint on canvas, but what we gain by having a programming language at our disposal makes up for this loss. At least in my opinion….
Now let’s look at how we can use Python to create these images. You can experiment with this color and texture worksheet.
There is not much more to say here since a lot is explained in the worksheet. But as you are creating, keep a few things in mind.
1. Use descriptive variable names. This helps a lot when you’re looking a lines of code. Using variables a, b, c, etc., doesn’t help much when you’re looking at a program you wrote a few months ago.
2. Comment liberally! Notes to yourself are easy to use in Python — just start a line (or part of a line) with the “\#” character. You’ll thank yourself later.
3. Save versions often! I won’t bore you with stories of using Mathematica to do some intense computations for creating digital art — and then read the “Mathematica quit unexpectedly” message on my screen — before I saved my work. I’ve encountered this in Python, too — if you use the online version, you’re connecting to an external server, which hopefully will not encounter problems while you’re working….
Also, as you change parameters, you may want to keep track of results you like. If there are a lot of these, sometimes I write the parameters as comments — so I can reproduce them later. Very important: don’t forget to keep track of the random number seed you use! The feel and texture of an image can vary dramatically with the random number seed, so don’t ignore this vital parameter.
One final thought. In creating this type of art, I keep in mind the tension between structure and randomness. You can use the computer to create randomness — but if there’s too much randomness, the image doesn’t seem to hang together. But if there’s too much structure, the image can lose its interesting texture, and appear flat and purely two-dimensional. So the choice of parameters in creating randomness is fairly crucial in determining how the final image will look. And as I’ve said before — this is where technology meets art. It is fairly easy to create a computer-generated image — but not as easy to create computer-generated art. The difference is not exactly easy to describe — and certainly opinions will differ. It is the questions which arise in describing the difference which are intriguing and exciting.
Enough philosophizing. Time to begin the artistic process! Feel free to comment by posting any images you create using the Python code.

the laptop is a super laboratory !
LikeLike