Mathematics and Digital Art is well underway! As promised, I’ll be giving weekly or biweekly summaries of how things are going. You’re also welcome to follow along on the course website.
Day 1 was the usual introductory class, with a discussion about the syllabus and what the course would be like. (Remember I blogged a four-part series on the course beginning at Day045.) I wanted to make it clear that there would be both mathematics and coding in the course. Some students ended up dropping the course the first week as a result, leaving the class with nine students.
On Day 2, I discussed representing color on the computer — using RGB values (both integer and real), as well as using hexadecimal notation. Since the course has no prerequisites, we really did need to start at the beginning. Students did some exploring with various RGB values using a Sage worksheet. (Links to all the worksheets and other websites referenced in class can be found on the course website.)
Josef Albers was the topic of Day 3. I’ve talked a lot about his work before, so I won’t go into great detail here. I let students try out a Sage worksheet — they had an assignment to create their own version which was due in about week, so we spent half the class starting the project.

Essentially, they needed to choose a color scheme and size for their piece. But then they needed to use five different random number seeds, and decide which of the five resulting images looked best to them, and why. So the assignment included a brief narrative as well. The complete prompt is on my website. (And I think I’ll just stop saying this — just know that anything I mention in these posts will be discussed in more detail on the course website.)
The next two classes focused on creating a piece based on Evaporation.
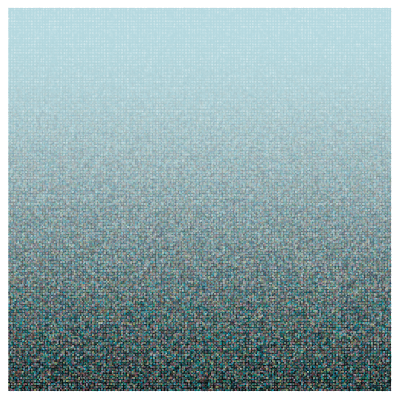
Again, I discussed this in some detail before (Day011 and Day012). The basic idea is to use randomness to create texture, both with color and geometry. Add to this the idea of a color gradient, and that’s enough to get started.
I took a bit of time on Day 5 to explain in some detail about how to create color gradients using a function like 

It turns out that having two of us in the computer lab is really great — debugging takes time. Students are gradually getting accustomed to the Sage environment, and learning to go back and redefine functions if they get an error message indicating that something is undefined….
I have really been enjoying the laboratory experience! My students are wonderfully creative, taking the basic motifs in directions I hadn’t considered. I’ll illustrate with a few examples from the first assignment. In this post and future posts, all work is presented with the permisson of the student, including the use of his/her name if applicable.
I should also remark that my intent is not merely to post pieces I subjectively like. True to the title of my blog, Creativity in Mathematics, I intend to illustrate creative, original ideas. I may feel that some students have been more successful with their ideas than others — but I’ll share that with the students individually rather than discuss it here.
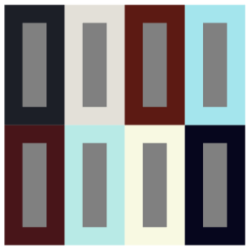
In order to talk about the students’ creativity, however, let me show you the image they started with.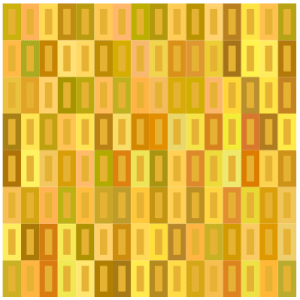
Andrew experimented with minimalism, creating a series of 2 x 2 images. This is the one he said he liked the best because of the symmetry and contrast.
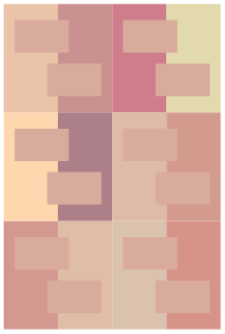
Julia was interested in exploring different geometries and created a few drafts which deviated from the rectangle-within-rectangle motif. Here is one of them.
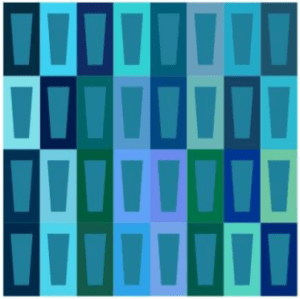
Safina took a slightly different approach. She wanted to create some variation by using trapezoids in the centers of the larger rectangles.
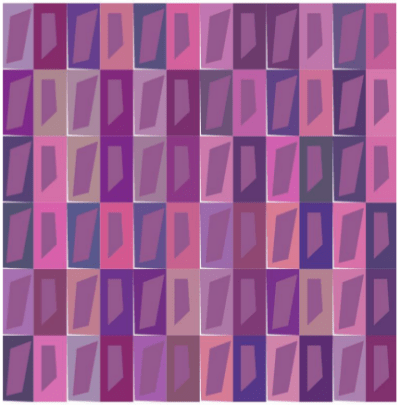
Ella really worked with the geometry, creating a lot of visual contrast — especially with the asymmetrical polygons.
So we’re off to a great beginning! Right now, Nick and I are having to help a lot with editing code since it’s a new experience for most students. But they are eager to learn, and as you can see, willing to explore new ideas, going well beyond where they started. We can look forward to a lot more interesting work as the semester progresses!
P.S. If you are ever interested in any of the students’ work and would like to discuss it further, send an email to vjmatsko@usfca.edu and I’ll forward it on to them!

One thought on “Digital Art I: End of Week 2”